


If you are wondering how to setup VPN server 2008 R2, this article will help you out. The first step in the process is to install the required software and the server. Then you should configure your MS-CHAP and DHCP relay agent and connect a client computer to the server. Once you have done all these steps, you should now be able to use the server to provide VPN access to your network.
PPTP VPN
PPTP VPN is a type of network protocol that connects remote devices to an enterprise server. The main goal of using this protocol is to secure the connection between a computer and the remote network. However, there are some specific setup requirements for PPTP VPN in order to make it work effectively. In this article, we’ll take a look at the basic requirements and then provide a step-by-step guide.
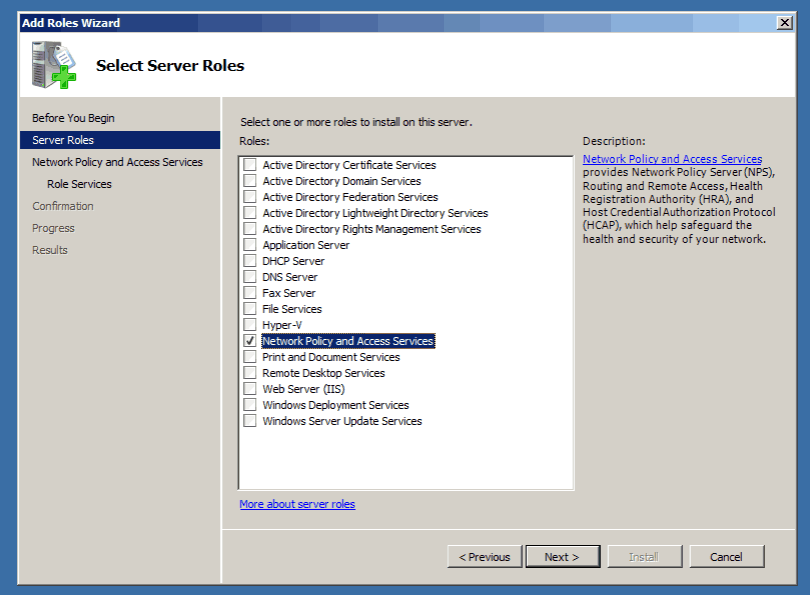
First, open Network Policy Server. It’s a local server that you install in Windows Server 2008. Next, select the role you want to assign to the VPN. This role can be Network Policy or Routing and Remote Access Services. Next, click Next to finish configuring the server. After selecting the role, you’ll need to configure it. Once you’ve finished configuring your network, you’ll need to grant access to the network.
Configuring DHCP relay agent
To configure a DHCP relay agent on your VPN server, open the Routing and Remote Access console on your computer. Right-click the server and choose Configure. Next, click the Edit button next to DHCP relay agent. On the Edit interfaces page, select Relay DHCP packets. Then click OK. DHCP relay packets are now configured.
To configure a DHCP relay agent, you must first define the network interface. After you have selected the network interface, you can click the Properties sheet and set the defaults. For example, the boot threshold and hop-count threshold are set to default values, but you can adjust them if necessary. You can even specify the number of seconds to wait before forwarding a DHCP message.
Next, configure the DHCP relay agent to match the client’s DHCP option. This option needs to match the IP address of the DHCP server. Then, configure the relay agent to take the appropriate action if it encounters the matching traffic. You must be a member of the local Administrators group for this procedure. You can also open the Routing and Remote Access MMC snap-in to configure the DHCP relay agent.
Configuring MS-CHAP
To configure MS-CHAP for VPN server 2008 R2, open the Security tab and double-click on the MS-CHAP option. This option will automatically select MS-CHAP version 2 when selected. Click OK to apply these changes. If the MS-CHAP option is grayed out, you may need to change it to enable it. Your network policy will be displayed.
To configure MS-CHAP for VPN server 2008 R2, you first need to create an AD security group. Select the group that contains the users you want to authorize for remote access VPN. In the list of users, enter the user name and password for the VPN connection. Then, click the checkbox next to the group name. Select the “VPN Users” group. Click OK to confirm the change.
You can also configure the network policy server to be a RADIUS server. The NAP server allows you to define network access policies and authenticate users against Active Directory. You can also configure it to allow all domain users to access the network. For more information, see Configuring MS-CHAP for VPN server 2008 R2 step by step
Connecting a client computer to the server
To configure the VPN on the client computer, you need to install a role called Remote Access. To do this, click the Manage tab and then select Add Roles and Features. Then, click Next. From the Control Panel, go to the Network and Internet option. Then, type “VPN” into the search bar. If the program is not automatically detected, the process may be troublesome.
To change IP addresses, go to the Routing and Remote Access MMC. Locate the IPv4 object. Choose the New Interface option. On the NAT tab, select Ethernet. Click the radio button that says Public interface connected to the Internet. After that, click Enable NAT on this interface. Check the VPN Server checkbox. This will open a service editing interface. Change the private address from 0.0.0.0 to 127.0.0.1 and click OK to save the NAT interface.

 | ExpressVPN Fast, anonymous browsing all over the world | |
 | NordVPN Enjoy online privacy and security with a reliable VPN | |
 | Cyber Ghost Browse anonymously with reliable security | |
 | SurfShark Affordable and reliable VPN for secure browsing | |
 | ZenMate Experience the internet anonymously | |
Purevpn Keep your data secure with a VPN built for privacy |