


How to Set a VPN in Laptop
Fortunately, setting up a VPN on your laptop is much easier than you might think. Simply access the Action Centre app located in the system tray and type “network & internet” into the box. Right-click the newly created VPN connection to choose the Delete option. This will remove it from your computer. This process takes just a few minutes. Now, you can start using the VPN without a hassle.
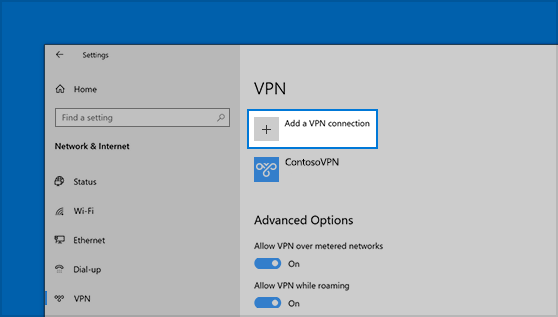
The first step is to click on the Start button and select Add a VPN connection. You will be prompted to type in the server address provided by your VPN provider. In order to do this, click the drop-down menu beside the name of the VPN provider. Next, enter the name of your VPN service in the Server name or address field. Once you have added this, click the Connect button and wait for the connection to complete.
Once you’ve finished logging in, click on the network icon on the Task Bar and select “Connect”. In “Settings,” choose the VPN connection and type in your user name and password. You can also use the Advanced Options to edit the connection settings and configure a VPN proxy. Once you’ve completed the steps, you’ll be able to surf the web with ease. Once you’re connected, you’ll be prompted to enter your password.
If you are using a Windows-based computer, you should choose the built-in VPN. Just type in the server name and username to get started. Once you’re done, click the Save option to make your VPN always on. When you’re ready to connect, simply go to the Advanced Options menu and type in your credentials. If you have any questions, consult with your IT administrator. This should be straightforward enough.
If you have an account on Windows Vista, you’ll need to choose the VPN service and enter its IP address in the address box. Once the VPN connection is configured, you’ll need to enter the server address and username. In Windows, the top-most setting will be labelled “Windows”. Once you’ve selected the desired server, you should click on ‘Connect’. The system tray will appear. Then, click on the Network icon and select the VPN.
To set up a VPN connection on Windows Vista, select the Network icon on the task bar. You will need to enter the IP address and the domain name of the VPN service. After entering the information, click “Connect” to connect to the server. After that, you can browse the internet through the VPN connection. This will allow you to browse the Internet from anywhere. While it’s important to be connected, remember to keep your IP address safe.
On the VPN screen, you’ll see the name of the VPN. Now, type in the username and password you’ve chosen. Then, click on ‘Connect’ to connect to your VPN. You should now be able to use the VPN to connect to your company’s network. You can even use this service for remote desktop. You can choose the country that you’d like to connect to from the list of available locations.
Once you’ve set up the VPN, you’re ready to connect your laptop to the server. The process is simple and easy. You should choose the type of connection you need and enter the necessary information. For Windows Vista, click on the Network icon. In the VPN window, choose the VPN service. When prompted, you can then select the server. In a few seconds, you’ll be able to connect to the VPN.
To set up your VPN, you should select ‘Connect to your company’s network. In Windows Vista, click on the network icon and then choose ‘Windows (built-in) as your provider. On this screen, you can type in the name of the VPN service and select a server. After you have chosen your server, you can connect to the VPN from your laptop. Your connection will be protected and encrypted.

 | ExpressVPN Fast, anonymous browsing all over the world | |
 | NordVPN Enjoy online privacy and security with a reliable VPN | |
 | Cyber Ghost Browse anonymously with reliable security | |
 | SurfShark Affordable and reliable VPN for secure browsing | |
 | ZenMate Experience the internet anonymously | |
Purevpn Keep your data secure with a VPN built for privacy |