


How to Connect to VPN in Laptop
The first step to setting up a VPN connection on a laptop is to install the VPN software. In most cases, you will need to sign into the service before you can start using it. In some cases, it can be difficult to log in if you don’t have the correct username and password for the VPN. To resolve this issue, you must sign into the VPN service before you can access the computer.
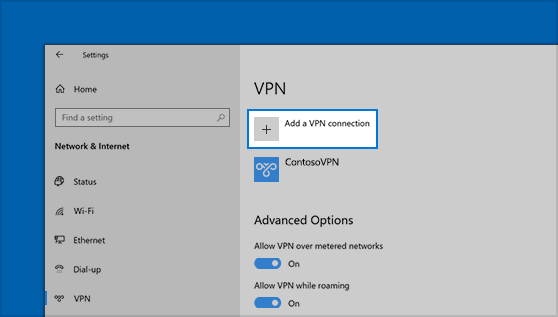
In Windows, you can create a VPN connection profile. To do this, simply open the Network Connections window and double-click the VPN connection profile. A profile can have any name you choose, so be sure to choose a name that makes sense to you. It will appear in the Server name box and address box. Be sure to type in the IP address of the VPN server and to choose the right type of VPN. If you’re at work, you’ll likely have a VPN provider’s network name in the network name field.
You can then click the “Add a VPN connection” option. To do this, press the Windows key and then type in “Network Connections”. After that, click the server name or address field. Once you’ve entered the server address, click the Add button. Once you have the server name or address field, you’re ready to connect to a VPN. To sign in, simply enter your username and password.
If you don’t want your laptop to join your domain, delete the VPN connection. To do this, you’ll need to open the Action Centre icon in the system tray. Then, click on Network & Internet and choose “Connection.” This will display the VPN connection you created. After clicking the connection, you’ll need to change the IP address of the server. You’re now connected to the network!
The next step is to delete the VPN connection. To do this, press the Windows key and type in “Network Connections” to get the settings you need. You can then click on “Network & Internet” to disconnect the VPN and re-connect. The VPN will be available on your laptop for as long as you have Internet access. Once you have your VPN set up, you can access the internet anytime, anywhere.
The next step is to delete the VPN connection. To do this, press the Windows key and type “network connections” in the search bar. After selecting a VPN, it will appear in the Action Centre window. Once the VPN is removed, select the network and select the service. If you have installed the software, it will continue to run. When you’re finished, you’ll be able to use the internet with complete security.
When you’re finished connecting, you should close the Action Centre window. To disable the VPN, press the Windows key and enter “network connections” on the search bar. The VPN will then be removed from the Action Center window. By deleting the VPN connection, you can use your laptop in a safe and secure manner. This is the easiest way to connect to a VPN. It’s also recommended if you’re upgrading the operating system or restoring your laptop.
To delete the VPN connection, you should first untick the ‘Use default gateway’ tick box. You can also select the network icon in the system tray and click it. You can now use the VPN to access the internet. The VPN connection will now be available on your laptop. It’s important to connect to a VPN for maximum security. The best way to do this is to sign in to the server with a different IP address.
To delete a VPN connection, you can do so by pressing the Windows key and typing “network connections” in the search bar. You can then delete the VPN connection by right-clicking it and choosing the ‘Delete’ option. By doing this, you can access the web anonymously. If you’re not sure how to connect to the VPN, you can always try reinstall the program. This way, you won’t have to pay for a separate VPN account.

 | ExpressVPN Fast, anonymous browsing all over the world | |
 | NordVPN Enjoy online privacy and security with a reliable VPN | |
 | Cyber Ghost Browse anonymously with reliable security | |
 | SurfShark Affordable and reliable VPN for secure browsing | |
 | ZenMate Experience the internet anonymously | |
Purevpn Keep your data secure with a VPN built for privacy |