
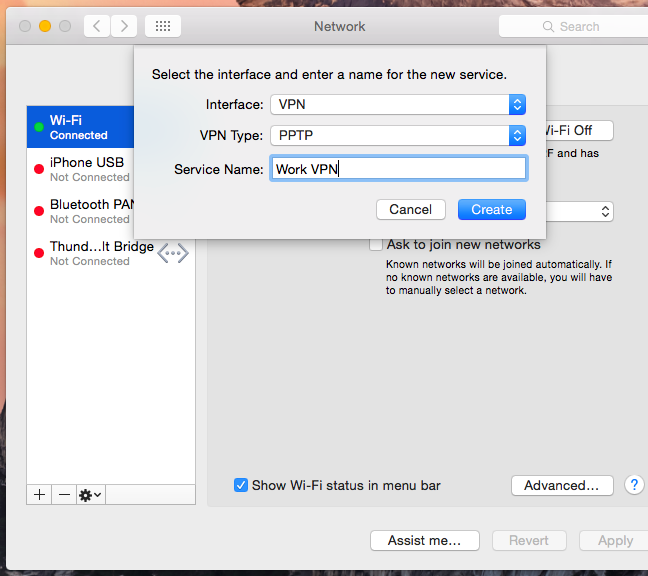

To add a VPN connection to your Mac, you must go to the System Preferences app and click on the Network button. Locate the Advanced button and select the “VPN” option. Next, you will have to provide the required information to the VPN provider. If you do not know your password, you can ask your IT administrator for the correct password. After you have added the necessary details, you will have to select the “Connect” button and choose the type of connection you would like.

The next step is to select the VPN service and enter the username and password for the connection. The server name is the name of the VPN server. Choose the VPN type that you want to connect to. The type of VPN depends on the company or service you have signed up with. After you have selected the type of VPN, you must enter your credentials. Typically, you will be asked for a username and password. Once you have entered the credentials, the VPN will start to connect to your Mac.
Once the connection has been established, you can continue browsing the web. To access a particular website, you will need to enter the username and password provided by your VPN service. When the VPN connection is set up, you will have to enter your security credentials. This will ensure that you’re protected at all times. The process to add a VPN connection on Mac is straightforward. You should be able to complete it within a few minutes.
Now, all you need to do is click on the VPN icon in the top-right corner of the taskbar or system tray. Once you’ve selected the service, you should now tap on the “Wi-Fi” icon in the taskbar or system tray. The newly created VPN connection should be right in the middle of the list and automatically start connecting. The process should take a couple of minutes and you can resume your work.
Once you’ve completed the setup process, you can now access the VPN settings. To do this, click on the VPN name in the top bar and enter the username and password for the VPN. Then, tap the “Add a VPN connection” button and wait for it to connect. Then, you’ll be prompted to enter a password. The password is the same one used to log in to your VPN account.
In Windows, the top right corner of the screen will contain the Windows logo and the settings button. There, click the Settings button. You’ll find this icon in the Network and Internet section on the left side of the screen. From here, tap the VPN settings to connect your PC. You’ll need to enter the username and password of the VPN service provider. Once the connection has been made, it will be available in your browser.
To add a VPN, you’ll have to go to the Settings app. Then, click the VPN service’s logo in the top right corner. After this, click the VPN icon located on the left side of the screen. To add the VPN, simply click the “Connect” button to the VPN. When the VPN is installed, your PC will be protected. However, you must make sure that you’re connected to the VPN before you can access websites.
Once you’ve selected a VPN service, you’ll need to enter the username and password of the VPN server. You’ll need to specify the type of VPN service you’re using and enter the credentials. In most cases, it’s just a simple matter of entering a username and password. Once you’ve completed this, you can start browsing the Internet safely. Just make sure you’re connected to the VPN server, or else your computer may be unprotected and not allow you to browse.
Then, you need to enter the username and password for the VPN server. The username and password will be provided by your VPN service. After entering the username and password, you need to close the Settings app. Now, you need to find the Wi-Fi icon on your system tray or taskbar. In the list, you should find the newly created VPN connection. After clicking the “Connect” button, the VPN will automatically connect and be active.

 | ExpressVPN Fast, anonymous browsing all over the world | |
 | NordVPN Enjoy online privacy and security with a reliable VPN | |
 | Cyber Ghost Browse anonymously with reliable security | |
 | SurfShark Affordable and reliable VPN for secure browsing | |
 | ZenMate Experience the internet anonymously | |
Purevpn Keep your data secure with a VPN built for privacy |